Showing posts with label ravelry. Show all posts

Wednesday, December 18, 2013

Retro Inspired complete

Just in time for the holidays I have another top done and I love it!  I got a great fit with this one giving me a real understanding of what 'negative ease' really is all about.  It's a word I've heard so many times in the sewing, as well as, the knit/crochet world.  This top is not zero negative, which I don't do much of anyway, it's probably half inch to an inch...breathing room.
I wasn't crazy about the moss stitch because it seems to puff out a bit, it's kind of grown on me now.  I especially like the way it lays on the collar.  I would reconsider using it as a bottom hem because of this tendency to puff or roll, unless I did something wrong.  I think it's great for sleeves if I plan to turn the cuff up, there's a nice crease there. 
I did excellent in the waist shaping and hip proportions, the entire sweater for that matter including the length. This sweater provides ample butt coverage though it would not be considered a dress option.
Even though I stated I did not care for having to start this top with individual pieces that had to be put together, I enjoyed learning a new technique and will most likely use it again.
The only mistake I made is in decreasing at the bust to start waist shaping.  The top was not going to have the fit I wanted so I started decreasing and they were not spaced out enough or maybe I should have started sooner.  I think it's because I was busy trying not to mess up that beautiful stranded work.  Anyway, I have a slight pucker under each underarm.  Hidden away from the world so it's not even a big deal I just want to learn from it so it won't happen again.

Keep stitchin

Monday, November 18, 2013

Retro inspired

I started a new sweater at the beginning of the month after the pattern I bought got a bit boring to me.  I'm started to look forward to doing my own thing rather than depend on someone's instructions to guide me through. It really take the pressure off when I don't feel I have to match what I see in the book or on paper.
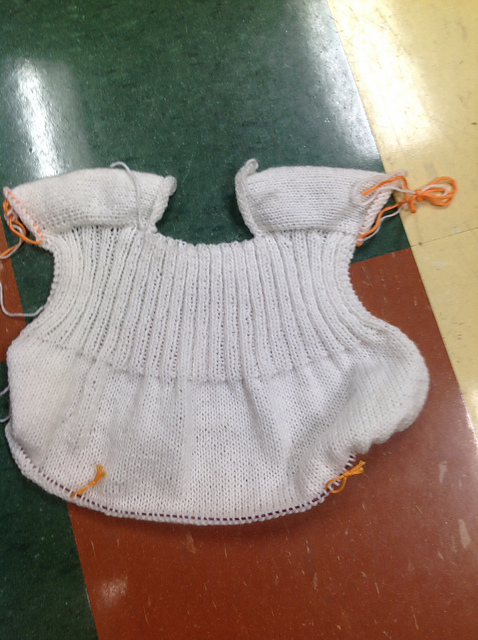
What I did this time is use a cardi, Retro Peplum, designed by Ann Budd as inspiration to create a pullover.  


Ann Budd’s directions, just like Doris Chan, can be a real head scratcher until you finally get it.  Then you wonder what all the crying was for, it’s all pretty cool and easy to follow.
While taking a look at the Retro Peplum, I had to read several times to make sure I was clear on the starting point.  Having never created a saddle shoulder top, let alone top-down, I was intrigued.  Ok, create the two saddles (rectangles) cutting yarn and securing with a stitch holder. Got it, set aside and wiggle my toes happily as I move on to the next step.
Hmmm, lets read that again…and again…and one more time for good measure.  Oooooook, now I’m on board!
-  Start at the end where I just finished knitting (live end).  Work to the other end where I began (cast on end) picking up 26 stitches. I only had to find a way to sneak in two extra stitches because I neat edges gave me 24 stitches. I was careful to pay attention as I slipped the first stitch of every row creating my selvage.
- Cast on 42 stitches using the Knitted CO which happens to be my favorite CO. Now started at the opposite end of the second saddle, pick up 26 stitches ending at the live end this time.  There should be 94 stitches.
Whew got through that and it’s time for shoulder shaping. Shoulder shaping is simple k2, p2 until the next row when short-rows start. OMG, why do short-rows make me so nervous! It’s actually not the w&t but the pick up on the return that gives me trouble.
Rows 1 and 2, wrap&turn, no problem.  Remember you are going all the way across to the opposite shoulder (saddle) for the first w&t.  Rows 3 and 4 pick up the w&t and then do ANOTHER W&T.  Rows 5 and 6, pick up the last w&t and knitted in pattern to the end of the row.  Yeah! All w&t’s done.  On the next part of the adventure. Simple 2x2 ribbing until piece measure 4” from pick up stitches at saddle NOT center back.


After I finished all the back ribbing, picking up the stitches and doing the same on the front halves with two skeins of yarn was easy.  I chose to work with dpn's instead of trying to keep the yarn from getting tangle using circulars.  This made life so easy for me and helped me get the fronts done much faster, IMO.
Introducing another color to create my first stranded pattern was fun.  I found a pattern for a pair of mittens that had the look I was trying to achieve.  I used that pattern and added a few extra rows of my own for a different look.  I wish I had repeated the whole series again for a wider band, I really love how it came out.  I fought the urge since I don't have that much white yarn, I have to reserve some for my sleeves where I'll be repeating the pattern transition.


I made sure to take my time and sketch out my grid for the pattern so I can have the exact same pattern on my sleeves.  I thinking of doing an icord neck with ties to finish it up for a causal look.

Keep stitchin'

Shenanigans Sam

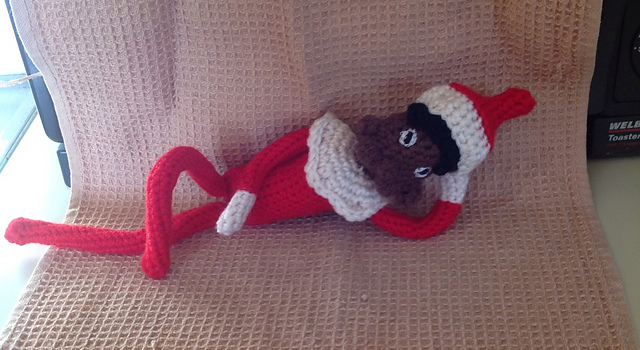
Last week I was reading about the Christmas Elf.  I had never heard about this little guy until recently (last year).  I said I was going to make a couple and never got around to it...until this year. So I made one with the intention of gifting it with the cute little story that goes along with it.  Mine came out kinda creepy looking and made me think it would probably scare a child so I'm keeping him for myself!
Making it was quite easy though time consuming with all the little bits. I picked a name for him after he immediately begin to look for things to get into like my penny cup.


There's no telling what he'll get into between now and Christmas.

Keep stitchin'

Thursday, October 17, 2013

Land ho!

My shawl is done!
I made several mistakes along the way, such is life.  Being human I've had my share of crisis and struggles.  So my shawl shows the points during the voyage when I was adrift.  But like any good sailor, I was able to weather the storm, check my navigation and bring her to shore.
The blues remind me of a sunny day and clear waters.  But as evening approaches, you see dusk, with the threat of a storm approaching in the purple skies.  The ship is tossed during that storm with several dropped stitches.  I recover and try to find the my lost stitches though not always successfully.  Once I reach the shore, even in the night, I can see the remnants of sea glass and shells that have washed ashore.  And I smile because I still made it to the end.

This shawl was definitely a whole lot easier than I expected it to be.  I'd say the hardest part was starting the circle.  After deciding to go with Emily Ocker's Circular Cast-on it was easier.  Of course starting anything with so few stitches is going to be bothersome to start so be prepared for some rough waters.  Find a quiet place to start your circle and work the first 4-5 rounds.  After that, you've got something to work with and life gets a little easier.


You can hardly see them but those little glints around the edges are the few beads I scattered.  The things that flicker in the night when the moonlight hits them.
Hopefully the ruffles will lay flat once the shawl is blocked.  The patterned leaves are beautiful and I am able to see some hearts.  I want all of that to show after blocking.  All in all I did enjoy making this and just may make another one next year.

Keep stitchin'

Monday, August 19, 2013

Persimmon nearly done

Just a bit more to go and it's done.  The only thing I really have left is the buttons and any embellishments I decide to add.  I like the fit and love the color. Simply Soft always has a wonderfully soft feel and is perfect for Fall temperatures.


Keep stitchin'

Thursday, August 15, 2013

Persimmon

Getting back into blogging seems to be a bit difficult for me but I'm trying.
My latest project is a top-down cardi in garter stitch.  I using the seamless method that Britt Schmiesing teaches with her cardi Seelie.   The instructions are very easy to follow and several have been made by ravelry members.  I found Britt when I went on a hunt for a top-down cardi that creates the button band along with the sweater rather than picking up stitches afterwards.  So was born Persimmon which is the name of the colorway of the yarn,  it's Caron Simply Soft.
The knit work was going pretty fast until I got to the sleeves.  I've ripped them several times trying to get the perfect fit.  The real problem came in when I decided that I should be knitting them in the round rather than back and forth like the body.  Mind you, this is after I got about an inch past the elbow!  The first sleeve was almost done. Once I started knitting in the round I noticed the stitches didn't look the same, I hated the look.  I finally realized its because the sleeve must be knit back and forth in order to blend with rest of the sweater.other than that the body is finished.  I remembered to mark the button band side so that I won't end up with buttons and holes that don't line up evenly.
This  is going to be a nice Fall sweater.


Keep stitchin'

Monday, May 31, 2010

Drops 107-1

I love this jacket! As soon as I saw this I knew I wanted to make it...or at least attempt it. The yarn, if I want to use what the pattern called for, is rather pricey so I ordered yarn from Smiley's instead. I expected this pattern to be very complicated and over my head but because of youtube, garn studio's own tutorials and so many other sites all over the net, I was able to see how to work the domino diamonds. This pattern is rather simple to follow and works up quite easy.


The only problem I have, because I didn't use the muskat that was used to create this jacket I don't have as much color and actually loose some of the beautiful detail. If you look this jacket up on ravelry you will be amazed at some of the color choices that were used to make this jacket. The lovely varigated yarns add so much more depth to this pattern but mine is lost.


The diamond pattern is very evident but the layers of color is missing. None the less, this is the best garment that I've ever knitted and it shows that I do have some skill for knitting. I have a long way to go before I'd say I'm good at it but this is a good start. Because I tend to be so critical of myself the mistakes I know I made nag at me at night when I should be sleeping! It's very hard not to rip & repeat everytime I make the smallest opps but I'm trying.


I'm glad to be nearly done with this jacket too. I have to finish the right side and make the sleeves to finish up. I didn't make my end of month deadline but, so what, I'll eventually be done and on to my next project.


Keep stitchin'