Friday, January 28, 2011

Lanesplitter done!

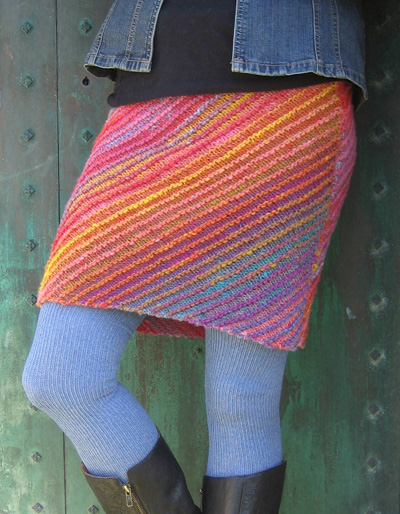
I finished my skirt and it came out wonderfully!!! I can definitely see myself making another one of these in a better quality yarn such as the Noro that Tina used to make the skirt. This acrylic tend to fuzz up and look knida kinky but I think I'm really going to like that. I think it will give lots of character to the skirt. Hopefully I'll be able to get a few shots of me wearing the skirt added shortly.


I have some beautiful options for blouses to wear with this skirt! My colors choices are many.

****************************************
So as promised I have a couple of photos I attempted to take of me wearing the skirt. I used the self timer feature on the camera and tried to show my 'good side'.

Making this skirt was a very easy, it did not require a lot of concentration but you do have to remember the increases. Then once you've gotten used to that and moved on to the straight portion then you have to remember the decreases. I'm happy to say I didn't have to rip any rows because of forgetting the pattern or forgetting to switch yarns. This pattern definitely gets two thumbs up!!


Keep stitchin'

Saturday, January 22, 2011

The Lanesplitter skirt

I found this really, really lovely skirt pattern called Lanesplitter by Tina Whitmore. For those of you are not on ravelry, WHY, you can link to it here at Knitty.


The pattern goes to a 4X so it will work. At the time of this posting there are 552 finished skirts of all sizes and wonderful colors on her page on ravelry! Eventually my finished skirt will grace that page. I choose to use Lion Brand Homespun for my first attempt since Noro is a rather pricey yarn for my pocket. I choose Homespun because ecorianne used it gave some good comments:

"with the homespun it will be kind of a fuzzy-ish skirt, perhaps perfect for the winter, over dance leggings… using some stash. micah and i both ended up loving it in the homespun--it’s a kind of chunky, fuzzy, nubby thing and rather nice."

I started out with US 10 needles but had to go down to a US 9 because I tend to knit very loose. I have no idea if my gauge is correct...probably not. Despite the gauge I am loving the skirt and can't wait to wear it. You can easily adjust the length so I made mine approximately 26" instead of 22" as the pattern stated. I have to admit, I am a slow knitter but the cold is definitely pushing me to hurry and finish this skirt. I'm expecting it to be nice and snuggly and warm as Homespun is known for.


Keep stitchin'

Saturday, January 1, 2011

I made my duct tape dressform

I finally got around to making my dress form. It's not the prettiest thing, in fact, it's very amateurish due in part to a 20 year old and a 12 year old helper who really were not happy about having to touch my body. So anyway it's finally done and resting I think securely on a recycled lamp pole. Now when I make my sweaters and scarves I won't have to beg someone to model them for me. I must admit, looking at the dress form makes it clear that I need to lose weight. It also makes it obvious to me that I clearly see myself as much bigger than I actually am.


January 5, 2011 UPDATE!!!
I dressform started having a wardrobe malfunction so I had to do some repairs quickly. I wasn't able to put a hanger in the shoulders, no way to hold it up. The body started to separate from the neck so I did some figure 8's around the neck and underarm area this seemed to do the trick.
I also neglected to give credit to my online help in creating the dress form. I've had a couple people ask me how I came up with the idea and wouldn't want to give the impression that I had anything to do with that. Of course there's tons of instructions all over the internet with detail like ehow, about and all those guys but I tend to be more visual. So I found a couple of girls on youtube called vintagegarbage. They goof around a bit but they give good details.

Keep stitchin'

Monday, December 27, 2010

Thumbless Baby Mitts

I guess I must be one of Santa's helpers because I'm still making gifts. I'm becoming addicted to hats of all things. They quick and easy enough to make on a whim. Since I was off today and certainly got bored, or rather suffered from withdrawal, I had to find something to make. So I came up with Thumbless Mitts for one of my nieces. She's just 6 months so thumbs really are not necessary yet. I combined info from toe up socks, hats and top down socks and mittens to come up with these little cuties. It's a really versitile that can use pretty much any stitch but I wanted fpdc to match the Reversible Strands Hat for Men pattern by Nancy Smith.


I think just about any yarn weight will work for these mitts as well but you may have to do a few more rows of increases. I haven't tried it yet but I think that it would be as simple as this:
inc every 4th st, inc every 5th st and so forth. Then reduce back down to for the wrist. I eyeballed this all thing so my niece hasn't even tried these on yet but it looks like they will fit. If they're too big, no problem.
Thumbless Baby Mitts
Materials:
I used a very small amount Caron Rainbow Tones (Country Rose) but any worsted weight yarn will do. Experiment with other yarn weights!
H crochet hook
Yarn needles for weaving in ends
Notes: Work first stich in same stitch where you joined when working sc rows.

Mitt
Chain 4
Rnd 1: sc in 2nd ch from hook and each across (3sc). Working on opposite side of chain, sc in next 3sc for a total of 6sc, join with a sl st and ch 1.
Rnd 2: work 2 fpdc in each sc. join with a sl st and ch 1 (12 dc)
Rnd 3: Work even, join with a sl st and ch 1
Rnd 4: *dc in the 1st st, 2dc in the next st. Rep from * around. join with a sl st and ch 1 (18 dc)
Rnd 5: Work even, join with a sl st and ch 1
Rnd 6: Work dc in the 1st dc, 2 dc in the next. Work 2 dc in every 3rd st around. Dc in the last st. join with a sl st and ch 1 (24dc)
Rnd 7-13: Work even (24dc)

Wrist
Rnd 14-15: Sc in each stitch.
Rnd 16: Dec 3 sts evenly spaced (21 dc)
Rnd 17: Hdc in each st (21 hdc)
Rnd 18-20: Work fphdc in each sts around (21 fphdc)
Finish off.

I'm not a designer so I can't guarantee that this pattern is perfect but I hope it is.
Keep stitchin'

Friday, December 24, 2010

24 gifts in 24 days!

Well I haven't posted in some time but I think I'm about to make up for it today. I decided to make a gift a day up to December 24th which is my birthday. This came about as the result of someone asking me if a snowman was a gift to me. I told her it's just decoration for the holidays but it got me to thinking it would be a hoot to make a gift a day for my birthday. I know some folks who celebrate their birthday for an entire week leading up to their birthday or maybe just that weekend of their birthday. I decided to take it a step further and do the whole month just as a challenge for myself.
I actually set rules for this challenge:
  • All gifts are to be handmade (knit/crochet, sew)
  • Absolutely no yarn purchases, only use yarn from my stash can be used
  • Only supplies like beads, buckles, fabric for linings. buttons and others accessories can be purchased
  • Multiple gifts can be completed simutaneously in order to ensure a posting for everyday (I feel short a couple of days)
  • In the event of a missed posting two must be posted the next day to make up for it
  • Even fugly gifts counts (we has received those on occassion)
  • For the actual date of birth there most be a spectacular gift for my special day.

These are the rules I set for myself because I've never done this before. This was merely a challenge to myself to see if I could produce. I was late posting a couple of times because I was out late for appointments or family obligations. Most of the work could only be done in the evenings because I can't knit/crochet and work at the same time, though I'd love to.

My list of gifts:

  1. Bejai’s Shivers the Snowman
  2. Bejai’s Diamond Dishcloth
  3. Facial scrubbie
  4. Facial Scrubbie 2
  5. Red and White Bookmarker
  6. Blissful Cowl
  7. Cup Cozy #1
  8. Deep Blue Sea cup cozy
  9. Bejai’s Smidge Headband
  10. Blissful Simple Slouchy Beret
  11. Simple Slouch Beret 2nd try
  12. Scrubbie ryg
  13. My Breast Cancer tassel Bookmark
  14. My Breast Cancer Heart Bookmark
  15. Bejai’s Kerstboom Christmas Tree
  16. Bejai’s Glass Flip Flop
  17. My Breast Cancer Peephole Cover Medallion
  18. Lace Ponytail Holder
  19. My Breast Cancer Car Medallion
  20. Bucket List Ponytail Holder
  21. Bejai’s Holiday Ornament Dove
  22. Bejai’s bobble beauty hat
  23. Bobble Cowl
  24. Happy Birthday Tunic
What I learned from this is that I'm more than content crocheting and knitting as a hobby but I don't think I'd like being forced to meet deadlines, especially if it means something new everyday.


Keep stitchin'

Saturday, November 6, 2010

Still in the green

Ok so I'm been busy trying a little this and a little that before I make something else. I want new ideas for the new year. To while away some time I made a baby sleep sack for one of my co-workers. She it and especially the shades of green which match the nursery color scheme perfectly. I made the matching cap but forgot to take a shot of it so it's not here but it's made just like the sack. This is a very simple, quick project. The pattern is from Suettea Williams' blog, also found on ravelry.

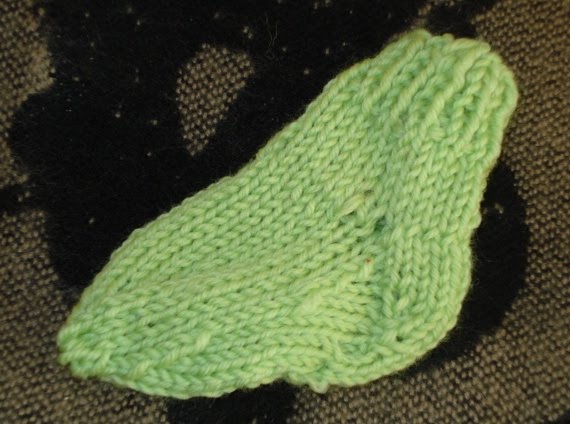
With some of the leftover yarn I decided to give sock knitting a try. I can practically crochet socks in my sleep now but I've always wanted to know how to knit socks. I found a decent pattern on knitty.com like Anatomy of a sock which included a 'trainer sock tutorial' by Kate Atherley. Even though the instructions are pretty good I needed to see it to get a good understanding of it. So I went surfing for a decent video online. The video I found on youtube is Dorret's. Excellent video for someone who needs to see how to knit socks, for me anyway. Dorret has a cute British accent but I think it's easy enough to understand what she's saying. The camera is over her shoulder so seeing everything from the right angle is very good. One of the problems I was having was figuring out how to get a circle started to make the cuff. Believe it or not I've knitted a skirt but I was drawing a blank. So Dorret's vid proved very useful in helping to simple get that circle started. I did make a few mistakes with the sock put I think its mostly the size. The pattern is for a mini sock that can be used as an ornament or put on a key chain. I think I know enough to now make a pair of socks for me. Then I'll try some for someone else when I know I've gotten it down.

Keep stitchin'

Sunday, September 26, 2010

Verdure

My latest cardi, using the Sweet pattern is Verdure. I came up with the name because I wanted something that means green with having to use the word. It's an opportunity to add a new word to my vocabulary.
Verdure-
- The fresh-green color of growing things; greenness
- Green growing plants and trees; green vegetation
- Vigorous or flourishing condition
- The lush greenness of flourishing vegetation.
- Vigorous greenery.
- A fresh or flourishing condition


I made the sweater holding two strands of yarn together throughout. Of course the sweater itself was easy because I've made nearly ten projects using this pattern/formula. I love the huge handmade buttons and applique that I made to dress the sweater up a bit.


Think I want pockets on the next one!

Keep stitchin'