Sunday, June 27, 2010

Alberta

I found this cute amigurumi doll pattern by Beth Ann Webber on raverly and thought this is too cute to pass up. There is a wonderfu pictorial on her flickr page that helps you design your doll, clothes for her and how to make her hair. The pattern is so easily altered to make little creatures too. Be sure to drop by her blog to see all the wonderful things she makes, including the fabric dolls too.

I took my doll to work to show her off and everybody loves her! They can't wait to see the clothes I make for her.
I have to talk about how I made mine up because I didn't have the supplies called for. I didn't have pipe cleaners so I used floral wire, 22 gauge I think, in the arms and legs with a little poly fill. I didn't have a wooden spool to put in the neck so I had to get creative. I cut a drinking straw into 1/2" pieces and taped four of the pieces together. I used lots of tape and stuffed in the neck but felt it wasn't going to stay in place...hmmmmm what to do? I wrapped a couple of rubber bands around the taped straws to add some traction! This was the perfect way to give the yarn something to grab on to and provide stability in the neck.
Getting the yarn for her lips was quite crafty, if I say so myself. I knew I didn’t want a bright red, nor did I want pink, I wanted a more ‘ethnic' looking shade. Since I don’t wear any make-up, ever…hmmmmmm what to do? <> I still have yarn left over from my Autumn Winds sweater, it has warmer shades of brown and red that I knew would work well. So I stretched out a piece of the yarn and dissected it to get the lovely warm reddish-brown color for her lips.
Now, when her clothes are complete and she has hair accessories, she will be a happy girl.


I'm behind on my blogging but I saved these notes to add everything once she was done. So, as you can see, she has a dress and bloomers now. I didn't follow the pattern to a tee, I just used whatever I already had in the house. Since I didn't have a rubber to fit her waist to make the bloomers I simply did a few chain links and made a belt to tie them on her. I would still like to make her some shoes and those hair accessories...maybe later when I finish some other started projects.
I finally came up with the name, I wanted something rather 'country' so I choice Alberta. Sorry all you Alberta's that are screaming, "I'm not country!". My doll, my name, my reason for choosing it.


Keep stitchin'

Monday, May 31, 2010

Drops 107-1

I love this jacket! As soon as I saw this I knew I wanted to make it...or at least attempt it. The yarn, if I want to use what the pattern called for, is rather pricey so I ordered yarn from Smiley's instead. I expected this pattern to be very complicated and over my head but because of youtube, garn studio's own tutorials and so many other sites all over the net, I was able to see how to work the domino diamonds. This pattern is rather simple to follow and works up quite easy.


The only problem I have, because I didn't use the muskat that was used to create this jacket I don't have as much color and actually loose some of the beautiful detail. If you look this jacket up on ravelry you will be amazed at some of the color choices that were used to make this jacket. The lovely varigated yarns add so much more depth to this pattern but mine is lost.


The diamond pattern is very evident but the layers of color is missing. None the less, this is the best garment that I've ever knitted and it shows that I do have some skill for knitting. I have a long way to go before I'd say I'm good at it but this is a good start. Because I tend to be so critical of myself the mistakes I know I made nag at me at night when I should be sleeping! It's very hard not to rip & repeat everytime I make the smallest opps but I'm trying.


I'm glad to be nearly done with this jacket too. I have to finish the right side and make the sleeves to finish up. I didn't make my end of month deadline but, so what, I'll eventually be done and on to my next project.


Keep stitchin'

Saturday, May 22, 2010

Take the shirt right off their back

Ok, not literally but he did give me his shirt. Yesterday was 'Bike to Work' here in Maryland.


No I did not ride a bike to work, plz. So since I'm working on building my tarn collection I'm always looking at people's shirts to see if they are cotton. Just something I do, just like I'm always looking to see if a sweater is knit or crochet and whether I could reproduce it not. Anywho, this man comes to my job to register for services and he has this green t-shirt hanging over his shoulder. I can some orange, some white and even some black that turned out to be blue in it. So I'm talking with a co-worker excitedly about the red tarn ball that I've already made and how I need cotton tees with lots of color in them and I point to the man's shirt and say, "Something like that shirt right there". He hands the shirt to me!!! I couldn't believe he was serious but he didn't ask for it back. That's when I saw it was one of the bike to work t-shirt from the rally that was held Friday morning.


So now I know how to get more cotton shirts, just walk right up to someone, look them straight in the eye; don't be afraid to hit them with the puppy face; and simply ask for the shirt off their back.


Once my tarn was complete it became evident that the colors aren't showing which is a little disappointing. I am reading up on dyeing with RIT so I can try my hand at dyeing fabric. There are some cool sites, including ehow with tons of info about dyeing fabric. Just watching the videos was exciting to me. So stay tuned for some adventures in tie dyeing!!
Keep stitchin'

Tuesday, May 18, 2010

Tarn!!

I made tarn! What is it? It's simple cutting an old t-shirts into a continuous strip to make a ball of yarn. That said ball of yarn is knitted or crocheted into something wonderful like a bag, hat, rug or maybe a pillow, to name a few. The only rules, which really aren't rules, is that you should use old t-shirts not brand new ones. Thus the recycle part comes into play. There are lots of tutorials on the web to help you learn how to make your tarn. After cutting up your first tee you will be an expert, at least at cutting.

Craft Passion is a very nice, very clear picture tutorial.
Eloominator is another tut that shows you using that cutting wheel thingy. lol I have one too but don't ask me what it's called.
Polka Dot Pineapple, yet another wonderful tut with excellent pics and instructions. PDP is really into recycle/upcycling so she has all sorts of great ideas for using up old jeans to make coasters, wire and scraps of fabric to make flowers and even painting window screen pink to make poinsettias!!

To make sure I didn't ruin a t-shirt I practiced with a piece of paper first. Just get a piece of paper and tape the ends together to form a tube, you've got the perfect practice piece. This will help you get used to where to make that first diagonal cut. If your diagonal cuts are off you will end up with a bunch of single loops instead of one continuous piece. Once I had the paper yarn down I was ready to make my own t-shirt yarn!


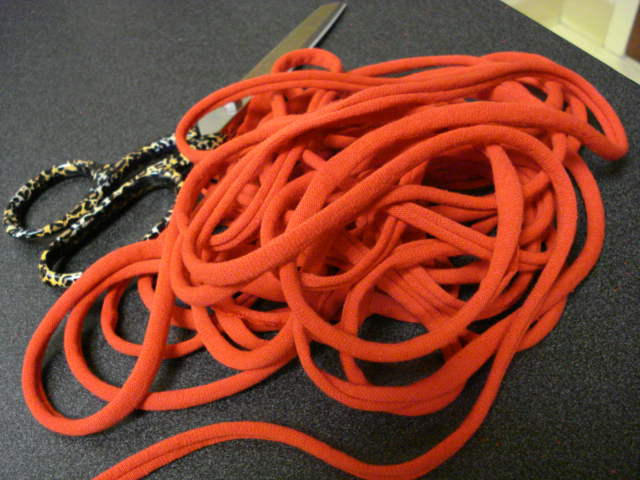
Since I've added links to such wonderful sites with instructions I'm not going to bore you with a tutorial myself. Instead I'll show what it looked like after cutting my strips leaving the one inch at the top, stretching after the diagonal cuts into one continuous strip and finally, my tarn ball! Oh, and check out my sewing scissors with the animal print hand, they make me feel like a real seamstress...not.
So what now, what to make, what to make with my first tarn. I have already started begging for more tees from the guys who for some reason don't want to part with them, hmmm. If you follow on ravelry take a look at some of exciting rugs, hats and bowls there on the From Trash to Treasures and Got T-Shirt Yarn groups. Oh, I almost forgot Petite Purls, great website with patterns for the cutest tutu, blanket and an awesome red hat. You will find it hard to believe these things are made from cut t-shirts!


Keep stitchin'

Saturday, March 6, 2010

Sock it to me

Sock it to me is right! This pair of socks came out better than my first two attempts. I'd like to think I'll get better and better at making sock...via crochet anyway. I have a long way to go when it comes to knitting socks. Anyway these socks are so unique in the striping pattern. The toe is fairly normal, if that's a word I could use. The cuff is another story altogether. It's more like splashes of color on one side but the other side is striped. I think this happened because I worked in rows rather than rounds as I did in the toe portion.


It's hard to believe that this is even a set/pair of socks let alone one sock but it's true. I think this uniqueness gives these socks really great character. Certainly, I'll never see anyone else wearing these socks. I can't wait to make more! First thing I have to do is come up with a pattern. I kinda winged this one taking a little from this pattern and a little from that one.

Keep stitchin'

Saturday, February 27, 2010

Say Amen

This started out kinda of strange. I wanted to make a simple hat for someone and I wanted to use yarn from the stash I already have. I went through my bins and decided to try something with Lion Brand Incredible and Vanna's Choice. I absolutely love the way these two work together. This is the perfect marriage, I couldn't have chose two better yarns to blend. The Incredible has beautiful shades of brown, pink and gold. The Vanna's Choice being rust blended perfectly. The Incredible, because it's a ribbon/tape has a bit of sheen that just catches the light and shines. The way the light it the yarn every now I was able to see a special speck of light which guided me in a different direction. I was 'inspired' to create this hat for a totally different person and I couldn't convince myself to do otherwise so I went with it and came up with the 'Say Amen' hat.

With a completed hat I thought something is still missing...a purse! So I dug in my bag of tricks and didn't have anymore of the Vanna's Choice in rust, oh no!!! Since I have had this yarn for some time I was worried I wouldn't be able to find anymore of it. So I went to Jo-Ann's with my fingers crossed and was supposed to find plenty of it! So I came home and made the 'Say Amen' clutch. I used the same yarns to make a crocheted button rather than trying to find a button to go with it.
This set, though winter is almost over, YIPPEE!!!!! I think the colors are perfect fall/winter colors. The photo of the hat almost reminds me of pumpkin pie. It could be that I'm hungry, it's past noon and I haven't eaten a thing today.
The set will end up going to a pastors wife that I really like. She already wears just lovely fashions including hats and purses that match. To me, this is a good set to add to her collection. hope she likes it.

Keep stitchin'

Saturday, February 20, 2010

Sunday Best hat

I finally came up with a hat that I think works with the Sunday Best Coat I made. Because I don't have any dolls to use I keep looking up meaurements on the Internet and I think I finally found something that works. It still looks too big to me and if I change the hook size it looks too small so I guess I have to wait until Fall 2010 to see it fits. I think I'll be able to adjust it a bit if it doesn't fit. All in all, very cute outfit.

Keep stitchin'