Wednesday, May 11, 2011

Robert Earl is coming!

Robert Earl finally sold the house down south and is coming for his sweet Alberta!

She and
Duke the pit bull are so excitedly planning for his arrival. I guess Alberta will be needing a new dress!!


Keep stitchin'

Thursday, April 21, 2011

Heart on my sleeves shawl/wrap

After finishing the NatCroMo 2011 challenge I wanted to continue with the freeform. There's a neverending borage of ideas flying through my head. I literally see everything in fiber art these days. I started making making little bullion spirals, tri-color spirals, paisleys and all sorts of things just for practice for that 'Big Project' living in my head. At first I thought I was making another wall hanging, something a little more balanced and thoughtout than the last one, when I was struck by this one little bullion. Just a simple red bullion, because I had some leftover red. I decided to add some orange top stitching, just practicing what I've read in Prudence's book. Well, since I wasn't feeling the orange top stitching I decieded to try some reverse single crab crochet (crab stitch) right over the orange top stitching and WOW!!! I loved what I had in my hand! No longer was it just a scrumble, it became an abstract heart.


Once I saw this lovely heart I knew what I wanted more hearts and this would become the theme for my piece. I needed to figure out how to put them together so I started adding the creamy open lace. That's when it hit be that should make a wrap instead of a wall hanging! I wanted my hearts to be different, especially since I was having trouble replicating this particular bullion heart. I started making paisleys and didn't care for it because one showed the wrong side of the work so I had to figure out how to reverse the pattern, I'm quite proud of myself.


I also got a leaf pattern from DeLeewit's Corner on raverly that I made hearts out of.


So now I have a nice freeform wrap with hearts all over my sleeves plus a few other spirals and goodies thrown in here and there. I love the crab stitch running through the wrap holding the individual pieces together adding that extra touch to the wrap.


Keep stitchin'

Saturday, April 2, 2011

NatCroMo 2011 has come to an end

Well, I was supposed to update every now and then but this project kept me busy and I didn't so it so, now that it's complete I can post my results.


The name I choose for this piece is 'Silence Amidst the Chaos' because of the beauty of the rose, and other flowers. There's also the beauty of sounds produced by a piece played softly on the piano. These things thrown in with squids, chains, wheels, volancos, smoke stacks and so much more. Being able to find peace in all that is wonderful so there it is. This piece will go up on my wall and provide stress relief for me as I stare into it and find all kinds of treasure like when you make things out of clouds. I can't wait to start another one and maybe make something that can be worn or simply a tote bag. This piece was about learning the art of freeform and letting go. What is the most important thing I learnt about ff? With ff you simply let go, don't stress. There's still so much to learn about freeform, irish crochet and russian crochet. My summer will be filled with learning these new things.


Keep stitchin'

Saturday, March 5, 2011

NatCroMo 2011

National Crochet Month 2011 = NatCroMo 2011
It's a group I joined on raverly. I joined this group to learn about freeform from some of the masters like the wonderful Prudence Mapstone, Sylvia Cosh & James Walters who introduced scrumbling. There are tons of amazing creations like the work of Antonina, Margaret Hubert, Myra Wood and so many I can't even name. Raverly is the place to be to see the collective works of these guys and the amateurs like me trying to learn a little sumn, sumn from them.

The list above is just few friends I've made on raverly that are in the NatCroMo 2011 group. It's a blast watching my piece transform day after day. It goes from looking like a hot mess to looking like possible art from one day to the next. So at the end of week one I have something that kinda looks like a putt putt car.


I'm not sure which direction the car is going yet but considering that could change tomorrow it really doesn't matter yet. Later I'll be adding all kinds of new stuff like bullions, spirals, beads, knots, twist and kinds of fun stuff I know nothing about!
It's unbelieveable that like crazy looking piece I'm working on will teach me skills that the designers had to learn in order to make the beautiful dresses, purses, curtain and such that I drool over.
So y'all come back ya here! So you can see how my piece transforms through the month.

Keep stitchin'

Saturday, February 19, 2011

Dublin Bay redo

My Dublin Bay sock weren't going so well so I decided to start over. This time things went much better and I'm very pleased with the results. Considering it's still cold out I look forward to wearing them very soon. Maybe Monday since we're supposed to get more snow.


Keep stitchin'

Sunday, February 13, 2011

Happy Valentines Day for who?

So this is a weekend for lovers...blahhhhhhh!
Since I love me just as much as someone else will...one day...soon I hope. I decided to make a nice breakfast for myself . Afterall, I know what I like:
  • Anything in a wine or champagne glass
  • Flowers, even artificial will do
  • Soft music
  • Nice place setting
  • Scented candle
I do these things for myself whenever the mood strikes just because I'm special. Well this morning was a bit too much for me with it being the weekend for love and all. I decided to make some simple homemade biscuits. You know the kind, 5 simple ingredients that most usually have on hand anyway; with the exception of the shortening. They came out nice and golden and with a dab of All Natural peanut butter they'll be great with eggs and coffee.

Why was this NOT a very good idea? Well I did mention the 'teary eyes'. Kinda stressful this morning watching EVERYTHING on every station revolving around lovers. I used Baking Soda instead of Baking Powdered in my biscuits. Big, big, big mistake!!! Of course I ate nearly an entire biscuit because I thought my taste buds were off since I'd just brushed my teeth. Once I walked back into the kitchen I realized what I'd done.
One of my friend mentioned not working on a good project while you're stressed because it makes a difference in gauge. Well, I think the same thing goes for cooking...just stick to knitting.
So with that said I did make another set stitch markers last night! I needed some for my crochet projects and for keeping track of needles when working with DPN's. These came out pretty good it I say so myself!


Keep stitchin'

Friday, February 11, 2011

Dublin Bay Sock

After completing my first pair of 'grown up' socks that actually fit the way they're supposed to fit, I gave myself a day to rest my fingers and then dove right into the next pair. I was hoping to find a simple cable pattern but instead I found a pattern that is absolutely lovely! It has a beautiful open lace pattern running down the left and right sides of the socks. The socks, found on raverly, are called Dublin Bay by Ryan Morrissey. For those not on rav, again WHY NOT, a pdf link can be found here as well. You have to scroll down the page, looking on the left sidebar for dublin bay socks under free patterns.


I finished all but grafting the toe on the first sock. I am now ready to start the second sock. I know I made 10 million mistakes in the sock but the open work on the sides is very forgiving! I shoved a white cup down inside of the sock to get a good shot of the lace pattern. It's a simple four row repeat, actually it's only two rows since both the even rows are knit. Not only did I make tons of mistakes but I made the mistake of not keeping track of how many repeats I did for the sake of the second sock. So once I've completed the second, or rather the first sock, I'll have to rip the 'other' sock and do it over again. At least I'll have good info on how far to go.


I also discovered through all my errors that I have a great amount of yarn leftover so I can afford to make the sock longer as well. The disadvantage of top down socks is not knowing if you'll have enough yarn to finish the socks. So messing up the first sock is looking to be not so bad after all.
Now I have to keep some better pics as well. The color of the yarn is more of a deep red or burgandy rather than purple as they are showing today.


Keep stitchin'

Tuesday, February 8, 2011

I guess the paint finally dried

I finished my socks on Sunday and actually wore them to work with blue pants on Monday, everybody loved them. They fit very comfortably in my shoes and there was absolutely no binding or pinching of the calves. When I took them off after work there was ring around my calf or that itching you get after having tight knee highs around your legs all day.


The shoe below is not the shoes I wore to work, I just wanted a dressy shoe to wear for my close up, LOL. Imagine, if the socks are this comfy with a MaryJane shoe it has to be very comfortable with a loafer-type shoe.


The yarn I used to make these sock is from yarn I already had in stock from Colours the Yarn Gallery in Randallstown, MD. I haven't been there in quite some time but I presume they are still in business, guess that means it's time for a visit.


Even though the beginning was a bit intimidating because I've never worked with yarn of this weight nor double pointed needles I am so glad I was able to push on and triumph with these socks. Now the beautiful socks on my computer's background to give me inspiration/motivation are my own and I've already started a second pair!

Keep stitchin'

Saturday, February 5, 2011

Like watching paint dry

This is how I felt when I started knitting these socks with sock/fingering weight yarn. The pattern I'm using list patience as one of the needed materials for making the socks. Honestly it seemed like it was taking sooooo long just to see an inch of cuff once I finished my 10 rows of ribbing. Several times I put the sock down and knew I'd never get those socks knitted. Then, all of a sudden, I got into my happy zone and had about 3" of cuff done! After that it turned into a good book that I didn't want to put down. Suddenly those stitches didn't seem so freaking small after all.


I'm using the Silver Sock Class tutorial provided by Kristin Bellehumeur to make my socks on double pointed needles. It's so very easy and very clear following Kristin's instructions. She provides three different methods for making socks and I want to try them all! Also, her instructions provide the cast on adjustments based on yarn weight so there's no need for gauge checking!!!
So I've finished all but grafting the toe of the first sock but I was too excited to finish that part. Instead, I went on and started the second sock and didn't go through that nasty 'watching paint dry' period at all!


I only have one regret with theses socks, the length. I have big calves and ankles, better known as cankles grrrrrrr. I was concerned that the socks would not come all the way up to my knees so I stopped at 6.5" like most of my socks...big mistakes. The socks have tons of stretch in them and would have been a great pair of knee highs without strangling my legs. I chalk it up to a learning experience and look forward to making another pair. This pair will certainly be knee highs. I can't wait to finish this pair, hopefully this weekend so I can wear them soon. I now see how people get addicted to knitting socks.
Here's a tip that I came up with that served as inspiration for me to finishe this project and any other that I may be struggling with.
"When I'm working on a project from raverly, especially a slow knitted project, save a finished project to your pc's background to provide constant inspiration to continue. For some it may be easier to print a copy and hang but with trying to lower carbon imprints just save it as a background or screensaver."
Looking at all the pretty FO's on raverly lead me think it would be nice to have that motivation right in front of me as a reminder. I set a beautiful pair of socks on my pc's background at work and at home so I'm constantly looking at them. Eventually, I'll be able to replace them with my own socks!


Keep stitchin'

Friday, January 28, 2011

Lanesplitter done!

I finished my skirt and it came out wonderfully!!! I can definitely see myself making another one of these in a better quality yarn such as the Noro that Tina used to make the skirt. This acrylic tend to fuzz up and look knida kinky but I think I'm really going to like that. I think it will give lots of character to the skirt. Hopefully I'll be able to get a few shots of me wearing the skirt added shortly.


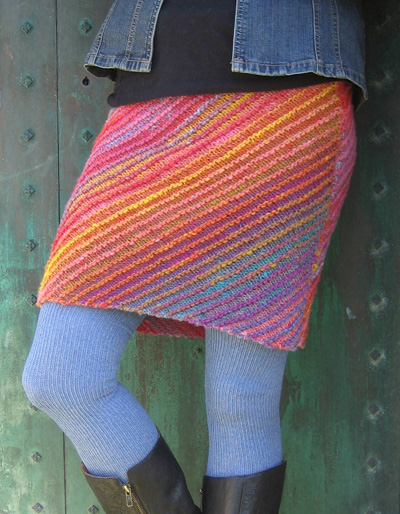
I have some beautiful options for blouses to wear with this skirt! My colors choices are many.

****************************************
So as promised I have a couple of photos I attempted to take of me wearing the skirt. I used the self timer feature on the camera and tried to show my 'good side'.

Making this skirt was a very easy, it did not require a lot of concentration but you do have to remember the increases. Then once you've gotten used to that and moved on to the straight portion then you have to remember the decreases. I'm happy to say I didn't have to rip any rows because of forgetting the pattern or forgetting to switch yarns. This pattern definitely gets two thumbs up!!


Keep stitchin'

Saturday, January 22, 2011

The Lanesplitter skirt

I found this really, really lovely skirt pattern called Lanesplitter by Tina Whitmore. For those of you are not on ravelry, WHY, you can link to it here at Knitty.


The pattern goes to a 4X so it will work. At the time of this posting there are 552 finished skirts of all sizes and wonderful colors on her page on ravelry! Eventually my finished skirt will grace that page. I choose to use Lion Brand Homespun for my first attempt since Noro is a rather pricey yarn for my pocket. I choose Homespun because ecorianne used it gave some good comments:

"with the homespun it will be kind of a fuzzy-ish skirt, perhaps perfect for the winter, over dance leggings… using some stash. micah and i both ended up loving it in the homespun--it’s a kind of chunky, fuzzy, nubby thing and rather nice."

I started out with US 10 needles but had to go down to a US 9 because I tend to knit very loose. I have no idea if my gauge is correct...probably not. Despite the gauge I am loving the skirt and can't wait to wear it. You can easily adjust the length so I made mine approximately 26" instead of 22" as the pattern stated. I have to admit, I am a slow knitter but the cold is definitely pushing me to hurry and finish this skirt. I'm expecting it to be nice and snuggly and warm as Homespun is known for.


Keep stitchin'

Saturday, January 1, 2011

I made my duct tape dressform

I finally got around to making my dress form. It's not the prettiest thing, in fact, it's very amateurish due in part to a 20 year old and a 12 year old helper who really were not happy about having to touch my body. So anyway it's finally done and resting I think securely on a recycled lamp pole. Now when I make my sweaters and scarves I won't have to beg someone to model them for me. I must admit, looking at the dress form makes it clear that I need to lose weight. It also makes it obvious to me that I clearly see myself as much bigger than I actually am.


January 5, 2011 UPDATE!!!
I dressform started having a wardrobe malfunction so I had to do some repairs quickly. I wasn't able to put a hanger in the shoulders, no way to hold it up. The body started to separate from the neck so I did some figure 8's around the neck and underarm area this seemed to do the trick.
I also neglected to give credit to my online help in creating the dress form. I've had a couple people ask me how I came up with the idea and wouldn't want to give the impression that I had anything to do with that. Of course there's tons of instructions all over the internet with detail like ehow, about and all those guys but I tend to be more visual. So I found a couple of girls on youtube called vintagegarbage. They goof around a bit but they give good details.

Keep stitchin'